
So I decided (mainly because we don’t focus on taking pictures while doing projects) that I’ll do a small write-up on installing an Allison MT643 in place of the Allison AT545
WHY? – Simple, if you’re a daily diesel driver then you’re familiar with hearing the turbo spool and the torque of the motor begin to pull you ahead, no matter what speed (unless you drive a dodge). With the Allison AT545 you don’t get all that power directly transferred to the wheels. It’s a good transmission for several reasons, First, not having a Lockup torque converter gives it smoother shifts, and the ability to convert torque with the slipping converter does help you get the ball rolling. It’s a great transmission if you plan to actually perform school bus duties and or other in town stop and go duties.
What is a torque converter? and locking? (I’ll be short about this) The torque converter is basically a fluid clutch between your motor and transmission. It works with a set of impellers and transmission fluid flowing between them to transfer power from the motor into the transmission. (see this ultra boring video about how it works How Torque Converters work). All Automatic transmissions have torque converters but the AT545 does not have the ability to LOCK. In essence, it always has some slip like riding the clutch in a standard transmission. The MT643 will lock the converter after accelerating through third gear directly connecting your driveline to the motor. because of this, there is less slip, less heat, lower RPMs per MPH and more power transferred to the drive tires.
Other benefits of the MT643 is its ability to handle more horsepower and torque from the motor and its Gross Vehicle Weight Rating(GVWR) of 70,000 Lbs versus the AT545’s GVWR of 30,000 Lbs. So… it’s Stronger.
So I bought the bus with the wrong transmission, but hey, it was a 15 window
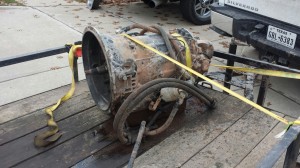
40 footer with tons of basement storage, low miles, all mechanical motor that’s easy to tweak. To me, it was worth it. I immediately set out to find a MT643 and I did, in Oklahoma. The guy bought a used 1992 International bus because he needed the motor in his harvester, and no doubt parted the rest of the bus out and got all of his money back, we paid $400 for this, which also had the torque converter, flex plate and flywheel, and a broken dipstick.
We waited three months and nearly finished our conversion and just pulled the trigger and started this project, a local shop (and friend) let us pull in and begin. Prior to this we did note that all the sensors, shift lever, throttle position modulator, dipstick tube, and filter was exactly the same and in the same positions for the swap, that made this even easier!
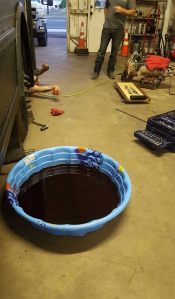
First we drained what we could in a kiddie pool, then started the unbolting and unhooking of sensors. Take the driveshaft down. take brackets for accessories and cable ties loose, unhook the shift linkage and start removing the bolts holding the transmission on the motor. for our particular model, there is not a transmission mount, the engine has a front mount and two rear mounts right at the bellhousing. Once loose, we slid a motorcycle jack under the transmission and starting sliding the AT545 off of the motor, once a few inches back you can see the Torque converter still bolted to the motor and more fluid will drain. because our front axle is behind the engine area our jack couldn’t slide it all the way back, so we slid the tranny onto the front axle and balanced it there while re-positioning the jack on the other side, we then slid it onto the jack again lowered it and dragged it out from under the bus (so far we’re two hours into this). 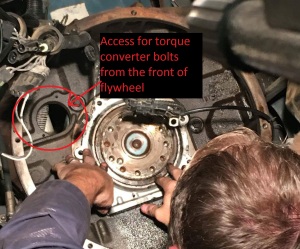 The next step was to remove the torque converter off the flywheel. to do this there’s an access port on the front of the bell housing, right behind the fuel pump/filter area. it’s a small plate held on by two 6mm bolts. it’s something you can’t really do alone because someone has to turn the motor by hand while you get your ratchet lined up the bolts/nuts. Now you can remove the bolts holding the flexplate/flywheel to the crank of the motor. We also removed the adapter off the bellhousing which makes the DT466 motor’s bellhousing smaller so the AT545 can mount. the MT643 would now bolt directly to the motor (as it was intended!)
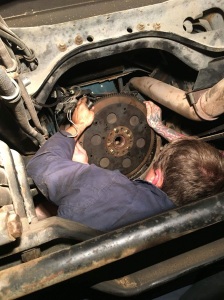
at this point, 3 hours into the project we discovered that the rear main seal (the thing I’m touching in the picture) was leaking a VERY SMALL amount of oil, actually it was so small it wasn’t even worth the effort or price or wait to replace it. but we did. which put this project off for another week. but hey, here’s some cool side by sides of the transmissions!
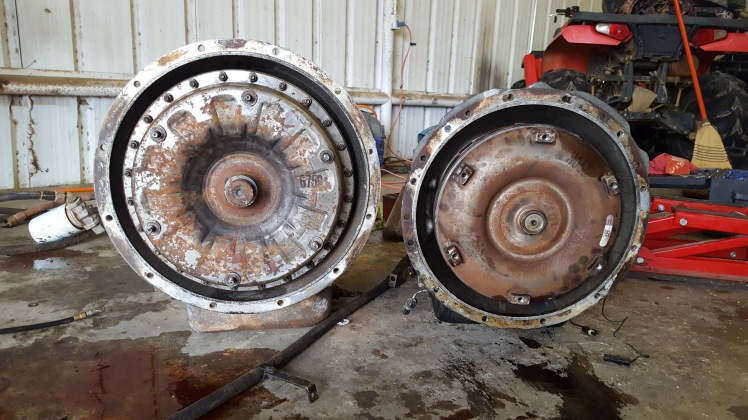
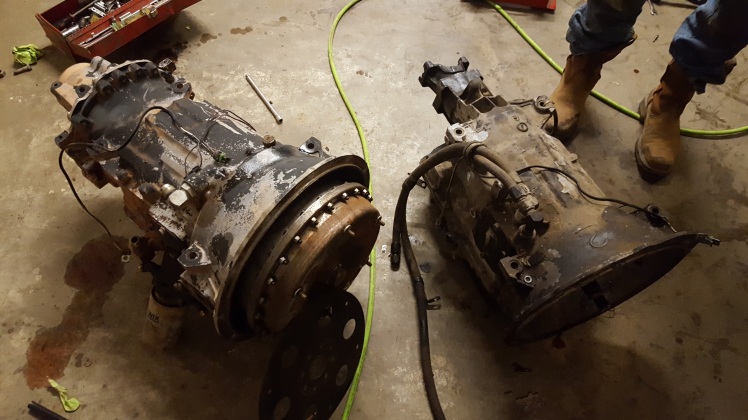
 Easy to see the difference there! so armed with a new seal, and a flexplate we bolt the flywheel and new flexplate to you have to make sure the holes for the torque converter are lined up on the flywheel so you can tighten them down from the access hole at the front. Now begins the process of getting the MT643 under the bus. If you noticed from above the 643 is a little larger, we had to jack the front of the bus up about 12 inches which lifted the bus but not the front axle, giving us larger clearance for the transmission to get above the axle. getting it in was similar to the out, roll it under the bus, slide it/balance it on the axle, re position the jack to slide it toward the motor. you have to lined the studs of the torque converter to stab the hols on the flexplate and Viola! it mashed together perfectly.
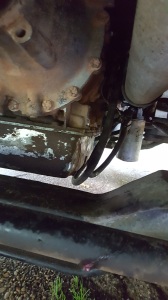 Now started the process of putting things together. we also at this point had to get adapters for the cooling lines so it would connect to our old lines (it’s crazy the connections were different, the inner and outer diameter of the hoses were the same)
As mentioned above, all the sensors plugged right in, Speed, temp, Reverse, Neutral safety.
The shift linkage was removed from the old one to work with the new one, the throttle position modulator slid right back in. and the dipstick tightened right in (off the old one) here we put the driveshaft in the yoke and pushed the carrier bracket on the other end up to where it bolts and measured how much needed to be cut off in order to line up again which was exactly 2.75 inches.
while waiting on the driveshaft (next day) we added fluid and started the motor and added more fluid as needed, next we checked the shifting and observed the yoke spinning as it should, although we weren’t going anywhere until the driveshaft was done.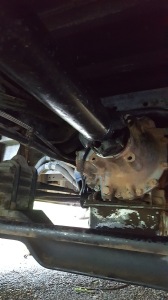
The drive shaft was shortened in Tyler TX at Texas drive shaft and PTO the also balanced it and painted it all for $95.00, it bolted right in, but first. we made some improvements to the motor!


Here’s the injection pump, the four screws holding on this cover (picture on the left) come out, if you notice that this cover has slotted holes, you can slide this (AFC Housing) forward for slightly more fueling before the turbo spools, but the most important thing is Post turbo fueling which is controlled by the metal plate under the housing. To do that you loosen the two screws on it and slide it forward for more fuel, back for less. (we slid it all the way, which doesn’t add a lot, but it is noticeable). the next step in boosting this motor is to advance the timing, from the factory it is set at 12 degrees, for the purpose of not blowing up the AT545 transmission. We advanced it to 17 degrees. I don’t have any pictures of this process but it’s very simple.
Remove the cover on the front of the injection pump with three 8mm bolts, there you will find four 13mm bolts on a wheel, along with a small hole just big enough for a small screw driver to slide in, while I held a screw driver in that hole (keeping pressure on it try to get it in more) my brother rotated the motor from the flywheel until the screwdriver slid in and jammed the motor from turning any more. this is where the current timing is set, I then loosed the four 13mm bolts on the pump wheel and while watching the harmonic balancer with my go pro via WIFI (there’s no room to see anything on a FE flat nose bus) by brother turned the motor backwards the 5 additional degrees on the timing marks. I then tightened the four 13mm bolts on the pump timing wheel and removed my screwdriver from the alignment hole. replaced the cover over the pump and fired the motor up.
HOLY SHIT.
This thing will throw you to the ground on take off, it shifts solid into third gear lockup and catches 4th gear and climbs without any problems, it will hold 70MPH without any issues. Instead of before where the RPMs stayed maxed out while the speed fluctuated, the RPMs are directly proportional to the speed after lockup, when you re apply throttle on the highway you can feel the engine immediately pull the bus forward without any slipping. That’s how diesels are meant to be! we averaged 11 MPG on a trip to Kansas and back.
Could not be happier about this! in the end, this project only cost $650. but I wouldn’t budget that for anyone else planning on doing the same, we got lucky in so many ways.

Using the 545 transmission lines have you had any issues with overheating your 643 I’m doing the swap as we speak and wondering if I should upgrade to the three-quarter inch ID tranny line or just keep the half-inch
LikeLike
With ours we had the new lines but after inspecting them further we realised the ID of the lines were the same, they just used bigger fittings on the ends. It didn’t make sense to do anything rise but take the easy route.
Another thought was, if the 545 slips constantly by design and generates more heat whereas the 643 locks, making less heat, why would it need more flow?
Either way, it didn’t matter if the rubber ID was the same.
LikeLike
Did you need a different flex plate?
Are the torque converters the same size – instal wise
LikeLike
Flex plate and torque converter are different. The torque converter has a larger diameter.
LikeLike
Great , thanks –
How about drive shaft? Need bigger?
I think my issue is getting my parking brake drum
On as well –
643 has larger output shaft ? Or same size?
I appreciate the info
LikeLike
Paul, The yoke off the 545 pulled off and fit right on the 643, we had to shorten the driveshaft 2.75 inches, (this is all in the blog)
LikeLike
How about flexplate/ flywheel –
I thought they where one in the same…
Two different pieces needed?
Thanks
LikeLike
They are not, the flywheel stays bolted on the crank, flex plate bolts on using the same bolts, then you reach through the holes on the flywheel and bolt the torque converter to the flex plate, just make sure you line it up when you slide it on!
LikeLike
Ok-
So did you need a new flywheel ?
Or just the new flexplate for the 643?
LikeLike
Which gear shifter do you have?
R n D 3 2 1 ? From the 545 ?
I assume it worked?
Mt543 manual calls for R N D 4 3 2 1
LikeLike
Nice job on the write up Tatum’s!
I have a 95′ genisis 36′ skoolie with a dt466 and p-pump.
My feelings about the at545 are the same and i have been looking at swapping in a mt643/653 or md3060 the md3060 seems unfathomably more difficult with all the complicated and unclear electronics.
You did a really good job clarifying the swap, i look forward to doing the same!
One question, where are the timing marks located?
Thanks!
LikeLike